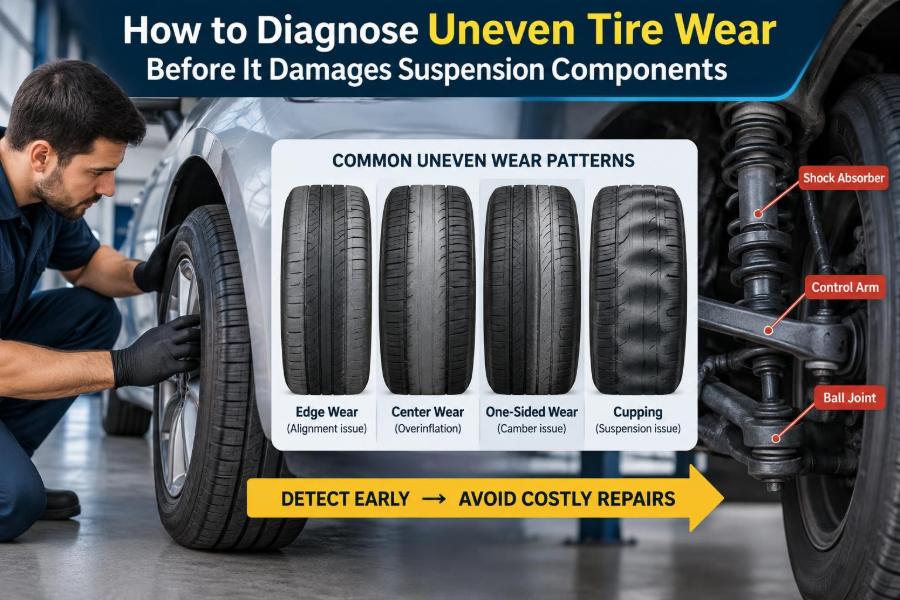

You notice it while washing the car: one front tire looks smooth along its inner edge, while the rest of the tread still appears usable. Or perhaps the steering wheel begins to shake on the highway, and the vehicle pulls slightly after hitting a pothole.
It is tempting to treat this as a tire-replacement problem. Sometimes it is. But tires are also remarkably useful diagnostic surfaces. Their tread records how the wheel has been meeting the road, often revealing a developing fault in alignment, steering, suspension, wheel balance, or inflation.
Ignoring an unusual wear pattern can shorten tire life, reduce wet-road grip, and allow a relatively minor chassis issue to become a larger repair. Catching the pattern early can protect both the tire and the components controlling its position.
The goal is not to diagnose every fault from tread alone. Instead, learn what to inspect, what patterns suggest, and when a professional measurement is the sensible next step.
🧭 Start With the Basic Idea: Tires Are Evidence
A tire should wear gradually and broadly across its tread when it is correctly inflated, properly matched to the vehicle, and kept in stable contact with the road. Real driving conditions prevent perfectly uniform wear, but large differences from one edge to another deserve attention.
Think of the contact patch—the small area of rubber touching the road—as a footprint. Suspension and steering components determine where that footprint lands, how it changes during turns and bumps, and how firmly it is loaded. Uneven tire wear is evidence that one of those conditions may be wrong.
🔎 Know What “Uneven” Actually Looks Like
Do not judge a tire by a quick glance at the outer shoulder alone. Turn the steering wheel to expose the front tires, use a flashlight, and inspect the full tread width. On rear tires, a mirror or a view from underneath may be necessary.
Look for differences in tread depth, texture, and shape. A tire can have acceptable average tread depth while one narrow band is nearly worn out. That narrow band may be the first clue to an alignment or mechanical problem.
📏 Check Tread Depth Across the Width
Use a tread-depth gauge at the inner shoulder, center, and outer shoulder of each tire. Repeat at several points around the circumference. The exact minimum legal depth varies by location, so follow local requirements and manufacturer guidance.
What matters diagnostically is comparison. If the center is distinctly shallower than both shoulders, or one shoulder is much lower than the other, record the result. Comparing left and right tires on the same axle is equally useful.
🧤 Use Your Hand to Find Hidden Texture Changes
With the vehicle parked safely, run your palm lightly across the tread blocks in both directions. The surface should generally feel even. A saw-tooth texture, where one edge of a tread block is higher or sharper than the other, is called feathering.
Wear may be easier to feel than to see, particularly on modern tires with dense tread patterns. Keep fingers away from sharp debris, and never inspect tires by touch near moving wheels or a running engine.
🗺️ Document the Pattern Before It Disappears
Take clear photographs of each tire, including the inside and outside shoulders. Note vehicle mileage, tire pressures, recent impacts, new parts, and whether the steering wheel has changed position. This information helps a technician distinguish a recent event from a long-running condition.
A simple sketch is also useful. Label each wheel position and mark where wear is occurring. Tire rotation can otherwise move the evidence to another corner of the vehicle.
💨 Recognize Center Wear From Overinflation
When a tire is consistently overinflated, its center portion may carry more load and wear faster than the shoulders. The tire becomes less able to conform to small road irregularities, so the middle of the tread does more work.
Check pressure when the tires are cold and use the pressure listed on the vehicle’s placard, usually found on the driver’s door area or in the owner’s manual. The maximum pressure molded onto a tire sidewall is not normally the vehicle’s recommended operating pressure.
🛞 Identify Shoulder Wear From Underinflation
Wear on both outer shoulders, with more tread remaining at the center, often points to chronic underinflation. A softer tire flexes more and spreads load toward its edges. It also runs hotter, which can accelerate damage under sustained use.
Underinflation can result from neglect, seasonal temperature changes, a leaking valve, wheel damage, or a puncture. Do not assume repeated low pressure is normal; find the reason rather than simply adding air every week.
↔️ Read One-Sided Wear as an Alignment Clue
Wear concentrated on either the inner or outer shoulder is commonly associated with alignment angles, though it does not prove an alignment-only problem. Bent components, worn joints, ride-height changes, and collision damage can all move the wheel outside its intended position.
Inner-edge wear is especially easy to miss because it faces underneath the vehicle. By the time it becomes visible from outside, the affected band may have very little remaining tread.
📐 Understand Camber Without the Mystery
Camber is the inward or outward tilt of a wheel when viewed from the front of the vehicle. Negative camber means the top of the wheel leans inward; positive camber means it leans outward.
Some negative camber is intentionally designed into many vehicles because it can support cornering behavior. Excessive negative camber, however, can overload the inner shoulder. Excessive positive camber can wear the outer shoulder. A wheel-alignment machine measures this angle accurately; visual inspection cannot confirm it.
🧷 Understand Toe and Feathering
Toe describes whether wheels point slightly toward each other or away from each other when viewed from above. Even a relatively small toe error can scrub tread across the road instead of letting it roll cleanly.
Feathering commonly accompanies toe problems. It may create a humming tire noise before the wear looks severe. Because toe can change as steering and suspension parts loosen, an alignment adjustment alone may not solve the cause.
🌀 Spot Cupping and Scalloped Tread
Cupping, also called scalloping, appears as repeating dips or high-and-low patches around the circumference. The tire may produce a droning or rumbling sound that rises with road speed.
This pattern often develops when the tire repeatedly loses ideal contact with the road. Weak dampers, wheel imbalance, bent wheels, loose bearings, or worn suspension joints are possible contributors. It is a pattern that deserves a broader inspection rather than a quick pressure correction.
⚖️ Separate Wheel Balance From Wheel Alignment
Wheel balance concerns how mass is distributed around the wheel-and-tire assembly. An imbalance can create vibration, often noticeable through the steering wheel when front wheels are involved or through the seat with rear-wheel vibration.
Alignment concerns the direction and angles at which wheels travel. Both conditions can contribute to irregular wear, but they are different tests and repairs. A balanced wheel may still be misaligned, and a correctly aligned vehicle may still have an imbalanced wheel.
🔩 Inspect Shocks and Struts as Tire-Control Devices
Shocks and struts do more than improve comfort. They control spring motion and help keep the tire pressed consistently against the road after bumps. When damping is weak, the wheel can bounce more than intended, contributing to cupping and unstable braking or cornering behavior.
A leaking damper, excessive body bounce, or uneven scalloping is reason for inspection, not automatic proof that the damper has failed. Mounts, springs, tires, and other suspension parts can produce similar symptoms.
🦾 Check Bushings, Ball Joints, and Tie Rods
Rubber bushings isolate movement while holding control arms and other components in a defined position. Ball joints and tie rods allow controlled steering and suspension movement. As these parts wear, wheel angles can shift under braking, acceleration, cornering, or road impact.
That movement may not be obvious when the vehicle is parked. A technician can check for play with the vehicle lifted safely and can judge whether a worn component is affecting alignment. Loose steering or suspension joints should be assessed promptly.
🏔️ Consider Springs and Ride Height
A sagging, broken, incorrectly fitted, or heavily modified spring can alter ride height. Because suspension geometry changes through its travel, ride height affects camber, toe behavior, and the way a tire meets the road.
Compare left-to-right ride height on level ground, using manufacturer-approved reference points where available. Avoid drawing conclusions from wheel-arch gaps alone; tire size, body shape, and loading can make those gaps misleading.
🕳️ Treat Potholes and Curbs as Diagnostic Events
If uneven wear, pulling, vibration, or an off-center steering wheel begins after striking a pothole or curb, arrange an inspection. The event may have shifted alignment, damaged a tire internally, bent a wheel, or stressed a suspension component.
Not every impact causes damage, and no visible crack does not guarantee the assembly is sound. A bent wheel may be subtle, while a tire sidewall can suffer internal injury without an obvious external mark.
🧲 Do Not Ignore Wheel Bearings and Hub Play
A worn wheel bearing can allow unwanted movement at the hub. Depending on the design and severity, that movement can affect tire contact and create noise, vibration, or uneven wear.
Growling that changes with vehicle speed or turning load is one possible clue, but tire noise can sound similar. Diagnosis should include a physical bearing check rather than relying on sound alone.
🧱 Distinguish Tire Defects From Chassis Faults
A separated belt, out-of-round tire, manufacturing issue, or damage from an impact can create vibration and abnormal wear even if alignment readings are acceptable. A tire can also be damaged by running severely underinflated.
For this reason, a careful diagnosis examines the tire and wheel before blaming suspension components. Ask a shop to check radial and lateral runout if a vibration persists after balancing, especially when a wheel or tire looks visibly distorted.
🔄 Understand Why Tire Rotation Helps—and Its Limits
Rotation moves tires between positions so normal front-to-rear load and steering differences are distributed more evenly. Follow the rotation pattern permitted by the tire type, wheel setup, and vehicle manufacturer. Directional and staggered tire arrangements may restrict where tires can go.
Rotation does not correct alignment, inflation, or worn parts. Moving an already damaged tire can spread noise and vibration to another axle while the underlying cause remains.
🚘 Notice What the Vehicle Tells You While Driving
Driving symptoms add context to tread inspection. Watch for a steering wheel that is no longer centered, a pull that remains on a reasonably level road, vibration at certain speeds, clunks over bumps, or a new road-noise pattern.
Road crown, crosswinds, tire construction, and braking conditions can influence these sensations. A brief pull on one street is not a diagnosis; a consistent change across suitable roads is more meaningful.
🛑 Know When the Tire Itself Needs Immediate Attention
Some conditions are not “monitor and see” situations. Replace or seek immediate professional advice for a bulge, exposed cords, deep sidewall cut, rapidly worsening pressure loss, or severe localized wear that has reached the tire’s wear indicators.
Do not attempt to repair structural tire damage with sealant or a surface patch. A tire is the vehicle’s only contact with the road, so uncertain structural condition should be treated conservatively.
🧰 Prepare for a Productive Alignment Appointment
An alignment is most useful after tire pressures, tire condition, wheel condition, and worn mechanical parts have been addressed. Aligning a vehicle with loose tie rods or damaged bushings can produce readings that change again as soon as the vehicle is driven.
Bring your photos and describe when the symptom started. Ask for the before-and-after alignment printout when available, and ask whether any readings are limited by non-adjustable factory geometry or damaged components.
📊 Interpret Alignment Numbers With Care
Green or red values on an alignment printout are helpful, but they are not the complete diagnosis. A value within a specified range can still differ enough side to side to influence vehicle behavior, while a value outside range may be acceptable only after the reason is understood.
| Observation | Possible contributors | Sensible next step |
|---|---|---|
| Center tread worn most | Overinflation | Verify cold pressure against placard |
| Both shoulders worn most | Underinflation or overload | Check pressure and investigate leaks |
| One shoulder worn most | Camber, bent part, ride-height change | Inspect suspension and measure alignment |
| Feathered tread blocks | Toe error or looseness | Check steering/suspension play before alignment |
| Cupped patches | Damping, balance, wheel or hub issue | Inspect wheel, tire, bearings, and dampers |
Use the sheet as a conversation tool, not as a verdict in isolation. The technician should connect measurements to tire condition and the vehicle’s mechanical state.
🧪 Avoid the “One Symptom, One Cause” Mistake
Uneven tire wear often has more than one contributor. For example, low pressure may accelerate shoulder wear on a tire that is also experiencing an alignment issue. A cupped tire may remain noisy after a worn strut is replaced because the tread damage cannot reverse.
Work in a logical order: correct safety issues, repair loose or damaged components, set pressures, then align and balance as needed. Replace tires when their condition no longer supports safe use.
📅 Build a Routine Inspection Habit
Check tire pressure regularly, before long trips, and after major temperature changes. Inspect tread during washing, rotation, oil-service visits, or whenever a new vibration appears. Regular checks are faster and more useful than waiting for a tire warning light.
Also confirm that all four tires are compatible in size and construction as specified for the vehicle. Significant mismatch can affect handling systems and create confusing wear behavior, particularly on vehicles with all-wheel drive.
🧾 Keep Service Records for Patterns Over Time
Record tire installation dates, rotations, repairs, alignment results, and component replacements. A repeated inner-edge wear problem after several alignments may point to a part that shifts under load, an unaddressed ride-height issue, or vehicle damage requiring deeper assessment.
Records also help distinguish a new problem from a wear pattern that began before the current set of tires was installed. That distinction can prevent unnecessary replacement of parts based on incomplete history.
👨🔧 Choose the Right Level of Professional Help
A basic pressure check and visual inspection are suitable owner tasks. Vibration diagnosis, wheel runout measurement, bearing checks, and suspension-play testing require proper equipment and safe lifting practices. Never work beneath a vehicle supported only by a jack.
If a shop recommends suspension work, ask what play, damage, or measurement supports the recommendation. A clear explanation should connect the defective component to the symptom, not simply list parts that could be replaced.
🧠 The Core Principle: Protect the Tire and the System Behind It
Uneven tire wear is rarely just cosmetic. It can reduce traction, make a vehicle noisier or less predictable, and signal that loads are reaching steering and suspension components in unintended ways. The tread pattern provides an early opportunity to investigate.
Begin with pressure and a systematic inspection, then consider the pattern alongside driving symptoms and recent events. Treat alignment as a measurement and adjustment process, not a substitute for finding loose, bent, worn, or damaged parts.
The most effective diagnosis connects the tread pattern to the forces creating it, then corrects the cause before the next set of tires becomes the same warning sign. 🚗🛞🔧