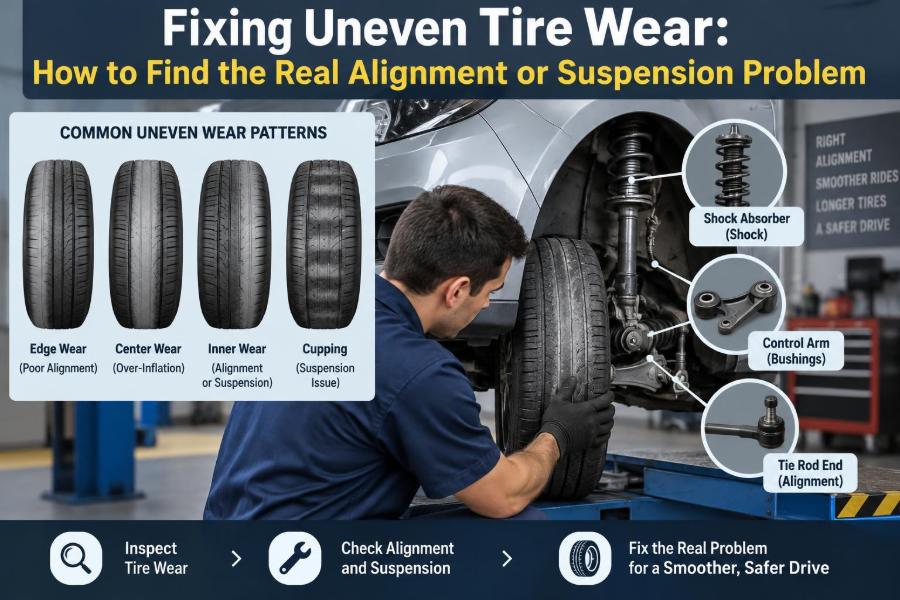

You notice it while washing the car: one front tire is nearly smooth along its inner edge, while the rest of the tread still looks serviceable. Or perhaps the steering wheel has started sitting slightly off-center, and the vehicle drifts across a flat road.
It is tempting to call this “an alignment problem,” book a wheel alignment, and move on. Sometimes that is exactly right. But uneven tire wear is a record of how the tire has been meeting the road, and alignment is only one part of that story.
A worn suspension joint, incorrect tire pressure, a bent wheel, weak damping, or a driving condition can produce a pattern that resembles poor alignment. Replacing tires or adjusting angles without finding the underlying fault can make the new tires wear the same way.
The useful approach is to read the wear pattern, connect it to the forces acting on the tire, and inspect the vehicle in the right order. That process saves tires, improves predictable handling, and can reveal safety-critical faults before they become more serious.
🔍 Uneven Wear Is Evidence, Not a Diagnosis
Tires do not wear randomly. Every revolution places rubber against the road under a particular load, angle, temperature, and amount of slip. Over thousands of kilometers, the tread records the result.
For example, wear concentrated on one shoulder often points toward pressure or wheel-angle issues, but it does not identify a single failed part by itself. A sound diagnosis asks what pattern is present, on which tire, and under what operating conditions.
Start by resisting the shortcut of assigning one cause to every unusual tread mark. “Cupping” is not automatically bad shocks, and inner-edge wear is not automatically excessive negative camber.
🛞 Learn the Main Tread-Wear Patterns
A visual inspection becomes far more useful when the wear pattern has a name. Check all four tires, including their inner shoulders, which are easy to miss while the wheels are fitted.
| Pattern | What it looks like | Common contributors |
|---|---|---|
| Both shoulders worn | Edges lower than the center | Low inflation, sustained heavy loading |
| Center worn | Center rib lower than both shoulders | Overinflation, unusually light loading for the pressure used |
| One shoulder worn | Inside or outside edge worn much faster | Camber, toe, bent parts, ride-height change |
| Feathering | Tread blocks feel sharp one way, smooth the other | Incorrect toe, compliance movement |
| Cupping or scalloping | Repeated dips around the circumference | Damping, imbalance, runout, loose components |
| Localized patch | One distinct worn or flat area | Lockup, severe imbalance, tire damage |
Several patterns can exist at once. A tire may be underinflated and also scrubbed by incorrect toe, making the diagnosis more involved.
📏 Begin With a Proper Baseline Inspection
Park on level ground, set the parking brake, and turn the steering so the front tread is visible. Use a tread-depth gauge if available, measuring the inner, center, and outer portions at several points around each tire.
Write down the readings rather than relying on appearance. Differences between positions and around one tire matter more than a single measurement. Also note tire brand, size, load rating, and whether all four tires match.
Look for stones, punctures, exposed cords, sidewall bulges, and cracking. If cords are visible, the tire is unsafe for normal road use and needs prompt replacement; diagnosis of the vehicle should continue before the replacement tire accumulates damage.
🖐️ Use Your Hand to Detect Feathering
Run your palm lightly across the tread from the inside shoulder to the outside, then in the opposite direction. Feathered tread feels relatively smooth in one direction and sharp or saw-toothed in the other.
This happens when tread blocks are dragged slightly sideways rather than rolling straight. Toe—the direction each wheel points relative to the vehicle centerline—is a frequent cause. Excessive toe-in and excessive toe-out can both scrub rubber, though the exact appearance depends on axle design and vehicle motion.
A hand check is a screening tool, not an alignment measurement. It can, however, identify a problem long before a driver notices vibration or a severe pull.
💨 Rule Out Tire Pressure Before Blaming Geometry
Pressure changes the tire’s contact patch, the portion of tread carrying the vehicle load. Low pressure allows the shoulders to flex and work harder; high pressure tends to load the center more heavily.
Measure pressures when the tires are cold, using the vehicle manufacturer’s placard specification rather than the maximum pressure molded into the tire sidewall. The sidewall figure is a tire capability limit, not usually the prescribed operating pressure.
A slow leak can make one tire appear to have an alignment problem. Check the valve, tread, bead area, and wheel for leakage if one position repeatedly loses pressure.
⚖️ Separate Alignment From Wheel Balancing
Alignment sets the geometric relationship of the wheels and suspension. Wheel balancing distributes mass around the rotating wheel-and-tire assembly so it does not create a repetitive centrifugal force.
They are commonly performed during the same service visit, but they solve different problems. An imbalance often causes a speed-related steering-wheel or seat vibration, while incorrect alignment more often causes directional instability or tread scrubbing.
Severe imbalance can contribute to irregular wear, particularly when combined with weak damping. Yet adding balance weights will not correct toe, camber, or a moving suspension joint.
📐 Understand Camber: Wheel Lean Viewed From the Front
Camber is the inward or outward tilt of the wheel when viewed from the front of the vehicle. A wheel leaning inward at the top has negative camber; one leaning outward has positive camber.
Some negative camber is deliberately designed into many vehicles, especially those expected to corner hard. During a turn, body roll and suspension movement can bring the loaded outside tire into a more favorable orientation.
The problem is not simply “negative camber exists.” Trouble begins when camber is outside the intended range, differs greatly side to side, or changes unpredictably because a joint, bushing, or spring has deteriorated.
➡️ Understand Toe: The Fast Tire-Wear Angle
Toe is measured by comparing the front and rear edges of a pair of wheels. If the leading edges point slightly toward each other, that is toe-in; if they point away, that is toe-out.
Even relatively small toe errors can wear tires quickly because the tire is continually forced to travel at a slight angle to its intended path. Imagine pushing a shopping trolley wheel sideways while rolling it forward: it still moves, but it scuffs instead of rolling freely.
Many alignment settings use very small specified toe values, so visual judgment is unreliable. This is why a professional alignment rack is valuable after mechanical checks.
🧭 Caster Affects Stability More Than Tread Directly
Caster describes the fore-aft tilt of the steering axis when viewed from the side. It helps the steering self-center and contributes to straight-line stability.
Caster usually does not create a simple shoulder-wear pattern on its own. However, a large side-to-side difference can contribute to pulling, wandering, or unequal steering effort, often after impact damage or a shifted suspension mounting point.
On many vehicles caster is not routinely adjustable. A measured caster problem may therefore be a clue to bent, worn, or displaced components rather than an adjustment that can simply be dialed in.
🧱 Why Ride Height Changes Alignment Angles
Suspension geometry moves through arcs as the vehicle rises and falls. A sagging spring, overloaded rear axle, altered coilover setting, or incorrect replacement spring can therefore change camber and toe at normal ride height.
Suppose a vehicle develops pronounced rear inner-edge wear after a spring breaks or sags. Adjusting the rear alignment without correcting ride height may produce settings that look acceptable on the rack but behave poorly once the chassis is restored.
Measure ride height using the manufacturer’s specified reference points where service information is available. Compare left and right sides and inspect for broken spring coils or incorrectly seated springs.
🔩 Inspect Ball Joints and Tie-Rod Ends
Ball joints allow controlled suspension movement, while tie-rod ends transmit steering motion to the wheels. Wear in either can let the wheel change direction or angle as loads reverse.
That movement is called compliance when flexible elements deflect under load, but excessive free play is a fault. A wheel may align correctly while stationary yet toe out or in while braking, accelerating, or crossing rough pavement.
Inspection requires safe lifting procedures and the correct method for the suspension design. A technician may check play by loading the wheel at different positions while observing each joint; forcing a wheel incorrectly can give misleading results.
🧰 Bushings Can Move Without Looking Broken
Control-arm bushings isolate vibration while locating the wheel. Rubber can soften, crack, separate from its sleeve, or deform internally without an obvious dramatic tear.
A worn rear bushing can allow an arm to shift rearward under braking or forward under acceleration. The driver may describe vague steering, a clunk, or a vehicle that needs repeated correction, while the tires develop irregular wear.
Replacing only the visibly worst bushing is not always enough. The decision should consider the condition of paired bushings, the availability of complete arms, and whether removal could disturb other components.
🛠️ Weak Dampers Can Create Cupping
Shock absorbers and struts are dampers: they control the speed of spring movement. They do not hold the vehicle up—that is principally the spring’s job—but weak damping allows the tire to unload and reload more sharply over road irregularities.
This can produce scalloped or cupped tread, especially when wheel balance, tire construction, or road texture also contributes. A leaking damper is a useful warning sign, but a damper can lose effectiveness without visible leakage.
A simple bounce test may reveal a severely underdamped vehicle, but it cannot reliably assess all modern suspension systems. Road behavior, inspection, and appropriate testing together provide a better answer.
⭕ Check Wheels and Tires for Runout
Runout is deviation from perfect roundness or straightness as a wheel or tire rotates. Radial runout is an up-and-down variation; lateral runout is side-to-side wobble.
A bent wheel after a pothole impact, a poorly seated tire bead, or a tire with an internal defect can create vibration and irregular contact with the road. The steering may shake at a particular speed range rather than at every speed.
Runout is measured accurately with a dial indicator or specialized balancing equipment. Do not assume that a wheel that looks round is mechanically true.
🚧 Impact Damage Often Has More Than One Result
A sharp pothole or curb strike can damage the tire, bend a wheel, shift alignment, and deform a suspension or steering component in one event. Treating it as only a balance issue may miss the more consequential fault.
Warning signs after an impact include a new pull, off-center steering wheel, vibration, a bulge in the tire sidewall, or an alignment angle that cannot be brought into specification. A tire with a sidewall bulge may have damaged internal cords and should not be treated as cosmetic damage.
Ask when the symptom began. A clear event timeline often narrows the inspection faster than an alignment printout alone.
🧲 Brake Problems Can Mimic a Pull
A vehicle that pulls during braking may have an alignment issue, but a sticking caliper, restricted flexible brake hose, contaminated pad, or unequal braking force can also be responsible. The tire wear may be secondary if the driver repeatedly corrects the vehicle’s path.
After a drive, an abnormally hot wheel can be a clue, though brake components can cause burns and should not be touched directly. A burning smell, smoke, reduced fuel economy, or one wheel coated in brake dust warrants prompt inspection.
Alignment does not repair a brake fault. Separate the condition occurring while coasting from the condition occurring only under brake application.
🛣️ Road Crown and Driver Perception Matter
Many roads are crowned or sloped for drainage, so a vehicle may gently drift toward the lower side even when alignment is correct. Wind, grooves in worn pavement, and wide tires can also create a sensation called tramlining, where the vehicle follows road channels.
Test a suspected pull on several reasonably level roads, traveling in both directions where safe and lawful. If the direction of drift changes with the road slope, road crown may be a substantial influence.
This does not mean a persistent pull should be ignored. It means a good diagnosis separates vehicle behavior from environmental effects before parts are replaced.
🔄 Tire Conicity Can Cause a Real Pull
A tire is not always perfectly uniform. Manufacturing variation or internal belt characteristics can make it roll slightly like a cone, creating a lateral force even when alignment angles are correct. This is often called tire conicity or tire pull.
A useful diagnostic method, performed only when tire sizes and wheel arrangements permit, is to swap the front tires left to right and retest. If the pull reverses direction, the tire is a strong suspect.
Directional tires must remain on their intended rotational side, and staggered tire setups cannot simply be cross-swapped. Follow manufacturer guidance and use a shop if the correct test is uncertain.
📊 Read an Alignment Printout Critically
An alignment report provides before-and-after measured angles, usually with a target range. Green numbers indicate values inside the machine’s programmed range, but they do not prove that the suspension is healthy.
Pay attention to left-to-right differences as well as whether a number is “green.” A value near one end of the allowed range may be acceptable, but the technician should consider pull, tire wear, vehicle loading, and available adjustment.
Also ask whether the steering wheel was centered during the procedure and whether rear thrust angle was checked. A rear axle that points slightly off-center can make the driver hold the steering wheel crooked to travel straight.
🧪 Align Only After Mechanical Repairs
There is little value in setting toe with loose tie rods, replacing a damaged control arm after alignment, or aligning a car while a broken spring is still affecting ride height. The measurements will change when the faulty component is repaired.
The efficient order is generally: inspect tires and pressures, identify mechanical faults, restore ride height and secure mounting, then align the vehicle. Balance or runout work is added when vibration or tire condition indicates it.
Some damaged tires must be replaced before final evaluation because their wear or internal condition can distort the road test. New tires should not be installed as a substitute for diagnosis.
🧾 Record Conditions Before Visiting a Shop
A short, specific symptom record helps a technician reproduce the concern. Note whether the pull occurs while coasting, braking, accelerating, or only on a particular road; also record the speeds at which vibration occurs.
- Photograph inner, center, and outer tread areas.
- State when the tires were installed and whether wear began before or after an impact.
- Bring prior alignment reports and repair invoices if available.
- Describe modifications, towing, heavy cargo use, or recent suspension work.
“It feels wrong” is still useful information, but observations tied to conditions prevent time being spent chasing the wrong system.
🧑🔧 Questions to Ask During Diagnosis
A quality service discussion should explain findings rather than merely sell an alignment package. Ask which measured angles are out of range, what component or condition caused them, and whether any play was found before adjustment.
It is also reasonable to ask whether tires show a condition that will continue to cause noise or vibration after alignment. Alignment corrects future scrubbing; it cannot restore rubber that has already been worn unevenly.
If an angle cannot be adjusted, ask what evidence supports the recommendation for a particular part. Depending on the design, the cause could be a bent component, damaged body mounting point, altered ride height, or a missing approved adjustment provision.
⚠️ Avoid These Common Shortcuts
Several popular fixes provide false reassurance. Inflating a tire far above the placard pressure to “even out” shoulder wear changes handling and contact patch but does not correct the cause. Likewise, rotating a badly worn tire only moves the symptom to another corner.
- Do not judge alignment solely by a centered steering wheel.
- Do not replace dampers solely because any cupping is present.
- Do not ignore inner-edge wear because it is out of sight.
- Do not use aftermarket alignment shims or bolts without understanding their approved application and the underlying damage.
A repair should make mechanical sense, match the inspection evidence, and be followed by a road test where appropriate.
🔁 Rotation Helps, but It Cannot Erase a Fault
Tire rotation shares normal wear among tire positions when the tire design and vehicle setup allow it. Front tires often do more steering and braking work, while rear tires may wear differently depending on drive layout and alignment geometry.
Use the rotation pattern recommended by the vehicle and tire manufacturers, particularly for directional or staggered tires. Rotating at sensible intervals can reveal a developing issue early because a pattern follows the tire or remains at the axle.
Once severe feathering or cupping exists, rotation may change the noise but cannot make the tread smooth again. The underlying geometry or suspension issue still requires correction.
🏁 Modified Vehicles Need a Different Baseline
Lowering springs, lifted suspension, larger wheels, wider tires, and changed offset can alter suspension travel, steering geometry, load paths, and clearance. A vehicle may need alignment settings appropriate to its actual ride height, not merely a generic factory target.
This does not mean any unusual wear is inevitable on a modified vehicle. It means the alignment technician needs accurate information about the components installed, and the owner should expect compromises if suspension travel or adjustment range has been reduced.
Check for tire contact at full steering lock and through suspension movement. Rubbing can remove rubber rapidly and may damage sidewalls or nearby components.
🌧️ Operating Conditions Can Accelerate Wear
Frequent rough-road driving, repeated pothole impacts, high cargo loads, towing, aggressive cornering, and long highway runs do not create identical wear signatures, but they can amplify small faults. Heat and load make an already marginal tire or bushing condition show itself sooner.
Driving style matters as well. Hard braking and rapid cornering increase tread forces, yet they should not be used to explain away a clearly abnormal one-sided pattern on an otherwise ordinary vehicle.
Think of operating conditions as stress multipliers. They help explain rate and severity, while inspection identifies the physical reason the tire is loaded incorrectly.
🧯 Know When the Vehicle Should Not Be Driven
Some tire and suspension findings require more than a routine appointment. Exposed cords, a sidewall bulge, rapidly deflating tire, severe vibration, obvious steering looseness, broken suspension component, or strong brake drag are reasons to stop normal driving and seek professional assistance.
A vehicle that suddenly changes direction, needs constant correction, or develops a loud repetitive thump should be assessed promptly. Continuing to drive can turn a repairable issue into tire, wheel, or body damage.
Remote diagnosis has limits. A trained inspection is particularly valuable when safety-related parts may be loose, cracked, or structurally damaged.
✅ A Practical Diagnostic Sequence
Use a sequence that moves from simple external checks to measurements and component inspection. This reduces the risk of paying for an adjustment before discovering that a worn part made the adjustment meaningless.
- Check cold tire pressures, sizes, visible damage, and tread depth across each tire.
- Identify the wear pattern and note whether it follows a tire or stays at one vehicle corner.
- Road-test carefully to separate vibration, coast pull, brake pull, and road-crown effects.
- Inspect wheels, bearings, steering joints, ball joints, bushings, springs, dampers, and mounting points.
- Measure runout and balance when symptoms indicate rotating-mass problems.
- Repair faults, restore correct ride height, then perform a full alignment and confirm the result.
🧠 The Core Principle: Find What Moves the Contact Patch
The central question is not merely whether an alignment machine shows red numbers. It is what is causing the tire to meet the road at the wrong angle, with the wrong load, or with unstable contact.
Incorrect pressure changes contact-patch shape. Toe and camber change how the tread rolls. Worn joints and bushings let those angles shift in motion. Weak damping and runout interrupt consistent contact. Each mechanism leaves clues, but several can coexist.
When the inspection, road-test symptoms, tire pattern, and alignment data tell the same story, the repair is far more likely to last. That is the difference between resetting numbers and correcting the vehicle.
Uneven tire wear is best solved by treating the tire as evidence, repairing the condition behind that evidence, and aligning the vehicle only after its suspension can hold the correct geometry. A careful diagnosis protects handling, tire life, and confidence on every trip. 🚗🛞🔧