
A vehicle rarely changes from “fine” to unsafe in a single journey. More often, it sends small signals: a wet-road slip at a junction, a steering wheel that shakes during braking, a warning lamp that disappears after a restart, or a tire shoulder that looks smoother than the rest.
These signs are easy to postpone because the car may still start, stop, and reach its destination. Yet tires, brakes, fluids, suspension, and lights are all condition-dependent systems. Their performance changes gradually as material wears, contamination builds, or adjustment is lost.
For engineering students, these checks connect classroom concepts—friction, heat transfer, hydraulic pressure, fatigue, and vibration—to a real machine. For working professionals and everyday drivers, they are practical ways to recognize when routine maintenance should become a prompt inspection.
A careful visual and measurement-based check does not replace a qualified technician, especially where braking, steering, or structural damage is involved. It does, however, help you observe the right details, describe a fault clearly, and avoid driving on obvious risks.
🔍 Start With a Safe Inspection Routine
Park on firm, level ground away from moving traffic. Select Park or first gear, apply the parking brake where appropriate, switch off the engine, and allow hot components to cool before working near wheels or under the bonnet.
Use daylight or a good inspection lamp. A phone flashlight can reveal cracks and leaks, but avoid placing hands behind a wheel or under a vehicle unless it is correctly supported. Never rely on a hydraulic jack alone; use rated axle stands on approved support points.
🧰 Assemble Simple Condition-Checking Tools
A useful basic kit includes a tread-depth gauge, tire-pressure gauge, torch, clean cloth, gloves, and a notepad or phone camera. A digital tread gauge is inexpensive and more repeatable than judging by eye.
A ruler marked in millimetres can provide an approximate reading, but its broad end makes it awkward in narrow grooves. For brake inspection, a small mirror and torch may help, although wheel removal is often needed for a reliable view of the inner pad.
🗓️ Establish a Baseline Before Looking for Change
Record tire pressures, tread readings, mileage, and any visible observations when the vehicle is known to be in reasonable condition. Subsequent checks then become comparisons rather than guesses.
For example, a single 4 mm tread reading says less than a record showing that one shoulder fell from 5 mm to 3 mm while the rest of the tire remains near 5 mm. Uneven change often points to alignment, suspension, or inflation issues.
🛞 Understand What Tire Tread Actually Does
Tread grooves give water, slush, and loose material somewhere to move as the tire rolls through the contact patch. The contact patch is the small area of rubber touching the road at any moment.
On dry pavement, rubber compound and tread blocks generate grip. In wet conditions, reduced groove depth can make it harder to clear water quickly enough, increasing the chance of partial or complete hydroplaning. Tread depth is therefore not merely a legal or cosmetic issue; it affects wet-weather reserve grip.
📏 Measure Tread Depth Correctly
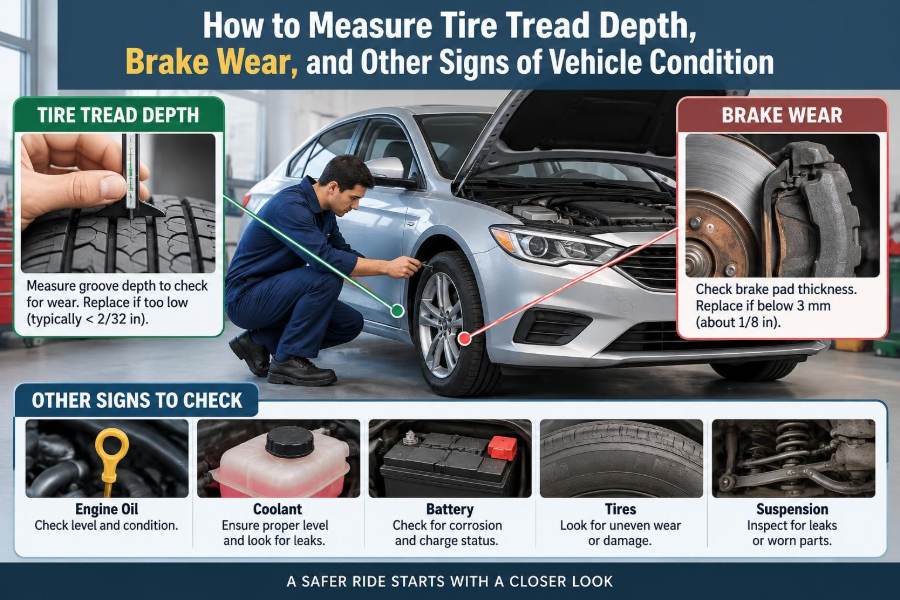
Insert the probe of a tread-depth gauge into a main circumferential groove, keeping the gauge base flat across the tread blocks. Do not measure from a molded raised bar in the groove. Read and record the depth in millimetres.
Take readings at three positions across the tire: inner shoulder, centre, and outer shoulder. Repeat this at several points around the circumference. A tire can wear unevenly, so one convenient measurement may hide the most worn area.
- Turn the steering to expose front-tire tread where safe.
- Check several principal grooves, not decorative sipes.
- Write down the lowest reading found for each tire.
- Compare readings across the axle and from inner to outer shoulder.
🚧 Read the Tire Wear Indicators
Most passenger tires contain tread-wear indicators: small raised bars molded across the base of selected main grooves. Their location is usually marked by a triangle, letters such as TWI, or a symbol on the sidewall.
When the surrounding tread is level with these bars, the tire has reached its built-in wear-indicator level. Legal minimum depths differ by jurisdiction and vehicle type, so local requirements must be checked. In practice, wet-weather performance can decline before a tire reaches the legal limit, particularly as grooves become shallow.
🪙 Use Coin Tests Only as Rough Screening
Coin tests are popular because they require no tool, but they depend on coin design and local conventions. They are useful only as a quick prompt to obtain a proper measurement.
A gauge produces a numerical reading that can be tracked over time and compared with manufacturer or regulatory guidance. For maintenance decisions, especially before a long wet-weather trip, measure rather than estimate.
📊 Interpret Common Tire-Wear Patterns
The shape of tire wear often provides more diagnostic value than the average depth. The table below describes typical patterns, not a complete diagnosis; multiple faults can exist at once.
| Wear pattern | Likely contributing condition | Useful next step |
|---|---|---|
| Centre worn more than edges | Repeated overinflation or unsuitable pressure | Check cold pressure against vehicle placard |
| Both shoulders worn | Repeated underinflation, cornering load, or fitment issue | Check pressure and inspect for damage |
| One shoulder worn | Alignment error, camber change, or worn suspension part | Request alignment and suspension inspection |
| Cupped or scalloped patches | Damping, balance, or suspension concerns | Have wheel and suspension checked |
| Feathered tread edges | Incorrect toe setting | Arrange wheel alignment |
💨 Check Tire Pressure When Tires Are Cold
Pressure should normally be checked before driving, or after the vehicle has been parked long enough for the tires to return near ambient temperature. Driving flexes the tire carcass and raises air temperature, increasing pressure.
Use the pressure figure on the vehicle placard, often found in a door opening, fuel-filler area, or handbook—not the maximum pressure printed on the tire sidewall. The sidewall figure is a tire capability marking, not usually the specified operating pressure for that vehicle.
🧱 Inspect Sidewalls, Beads, and Valve Stems
Look for cuts, deep scuffs, bulges, embedded objects, cracking, and areas where cords may be visible. A sidewall bulge can indicate damaged internal cord structure, which cannot be judged safe from appearance alone.
Inspect valve stems for cracking and ensure valve caps are fitted. Caps help keep dirt and moisture away from the valve core; they do not seal a failed valve by themselves. Any suspected structural tire damage deserves professional assessment rather than a temporary “wait and see” approach.
🧭 Notice Pulling, Vibration, and Steering Changes
A vehicle that drifts consistently on a level road may have an alignment, tire, brake, or suspension issue, although road camber and wind can also influence direction. Pulling that begins suddenly deserves quicker attention than a gradual, familiar tendency.
Vibration through the steering wheel may relate to wheel balance, tire deformation, loose components, or braking-disc variation if it appears mainly under braking. Describe when it occurs: speed range, throttle state, steering angle, and braking force all help diagnosis.
🛑 Know the Main Brake Components
In a disc-brake system, a hydraulic caliper clamps friction pads against a rotating brake disc, also called a rotor. Friction converts vehicle kinetic energy into heat. In drum brakes, brake shoes press outward against a rotating drum.
Most modern vehicles use discs at the front, and may use discs or drums at the rear. Regenerative braking in hybrid and electric vehicles can reduce friction-brake use in many situations, but it does not eliminate the need to inspect pads, discs, fluid, and parking-brake components.
📐 Estimate Brake Pad Thickness Carefully
With a wheel opening or removed wheel, identify the friction material bonded to the pad backing plate. Measure the friction material only, not the steel backing plate. Pads are often designed with wear indicators, but their service threshold varies by vehicle and pad design.
If the visible outer pad looks thin, do not assume the inner pad matches it. A sticking caliper slide or piston can create unequal wear. A technician can inspect both pads and assess whether the remaining material, wear pattern, and planned use justify replacement.
🔔 Listen for Brake Wear Indicators and Noises
Some pads use a small metal wear tab that contacts the disc and produces a high-pitched squeal as the pad becomes low. Electronic pad-wear sensors are fitted on some vehicles and may trigger a dashboard message.
Noise alone is not a precise diagnosis. Moisture can cause brief surface rust and a short-lived noise after parking, while stones, glazed pads, corroded hardware, or worn components can also squeal or scrape. Grinding or metal-on-metal noise requires immediate inspection, because it may mean the friction material has been consumed.
🌡️ Examine Brake Discs for Heat and Surface Clues
Through the wheel, look for pronounced scoring, cracks, severe corrosion, blue or purple heat discoloration, or an uneven outer edge sometimes called a wear lip. Do not touch a disc after driving; braking can make it extremely hot.
Disc thickness and runout—side-to-side variation as the disc rotates—require suitable measuring tools and correct procedures. A brake pedal pulse or steering vibration during braking may be associated with disc thickness variation, hub contamination, or other causes, so visual inspection alone cannot confirm the fault.
🧪 Check Brake Fluid Level and Condition
Locate the brake-fluid reservoir using the vehicle handbook. Check the level against the reservoir markings without opening it unnecessarily. A falling level can occur as pads wear because caliper pistons extend, but a rapid or unexpected fall can also indicate leakage.
Brake fluid absorbs moisture over time in many systems, which can lower its boiling resistance and contribute to internal corrosion. Follow the vehicle manufacturer’s specified fluid type and replacement interval. Never mix fluids casually or allow contamination from oil, water, or dirty tools.
⚠️ Treat Warning Lamps as Diagnostic Information
A red brake warning lamp may indicate the parking brake is applied, low fluid level, or a hydraulic-system issue, depending on the vehicle. An ABS lamp generally means the anti-lock function may be unavailable even though conventional braking may remain; it still needs diagnosis.
Warning lamps communicate a system’s detected condition, not always the exact failed part. If a brake pedal becomes unusually soft, sinks, requires pumping, or braking performance changes sharply, stop driving when safe and arrange assistance.
🛠️ Check Engine Oil Without Misreading It
For vehicles with a dipstick, park level and follow the handbook’s procedure for engine temperature and settling time. Withdraw the dipstick, wipe it clean, reinsert it fully, then remove it again to read the level between the marked limits.
Oil level that is too low can compromise lubrication; overfilling can also cause problems. Oil appearance alone is a weak indicator of service condition because detergents can darken oil normally. Follow the specified viscosity and approval, and investigate repeated top-ups rather than simply adding oil indefinitely.
💧 Look for Other Fluid Leaks and Reservoir Changes
Check coolant, washer fluid, and—where applicable—power-steering, transmission, or clutch-fluid reservoirs according to the handbook. Coolant must be checked only when the system is cool; opening a hot pressurized cap can release scalding fluid.
A clean sheet of cardboard placed under a parked vehicle can help identify fresh drips. Water from air-conditioning condensation is often normal, but oily, coloured, or sweet-smelling fluid should be identified rather than ignored. Fluid colour is only a clue, not a dependable diagnosis.
🔋 Assess Battery Terminals and Starting Behaviour
Check that battery terminals are secure and free from heavy corrosion. White or blue-green deposits can interfere with electrical contact. Use eye protection when cleaning and follow the vehicle procedure, particularly on vehicles with battery-monitoring sensors.
Slow cranking, repeated clicking, dimming lights, or frequent electrical resets may point to a weak battery, poor connections, charging-system faults, or excessive electrical demand. A voltage measurement can help, but battery condition is best assessed with appropriate test equipment under load.
💡 Test Exterior Lights as a Safety System
Walk around the vehicle with parking lights, dipped beams, brake lights, turn signals, reversing lights, and hazard lights activated as applicable. Reflections in a window or help from another person make brake-light checks easier.
Clouded lamp lenses, condensation that does not clear, or weak illumination can reduce visibility. Replace bulbs and lamps with correct types, and investigate repeated bulb failure because vibration, moisture ingress, or electrical faults may be involved.
🪟 Inspect Wipers, Washers, and Glass
Wiper blades should clear water without persistent streaks, chatter, or missed arcs. Rubber hardens and tears with age and sun exposure, so a blade can look acceptable while performing poorly in rain.
Check washer aim and fluid level before conditions demand them. Inspect the windscreen for chips and cracks, especially in the driver’s view. Damage can spread with temperature change and vibration, and its repairability depends on location, size, and glass type.
🪛 Observe Suspension and Underbody Clues
Look for fluid seepage from shock absorbers or struts, broken springs, damaged rubber bushes, hanging shields, and loose exhaust components. Avoid crawling underneath unless the vehicle is safely raised and supported.
Clunks over bumps, excessive bouncing after a road disturbance, uneven tire wear, or changes in ride height can suggest suspension concerns. These symptoms are not unique to one component, but they justify inspection because suspension affects tire contact and braking stability.
🚪 Check Body Condition Beyond Appearance
Rust is not always merely cosmetic. Corrosion around suspension mounting points, brake lines, seat-belt anchors, subframes, and structural seams can affect safety and repair decisions. Look at door sills, wheel arches, floor edges, and areas behind plastic trim where moisture may collect.
Also check that doors, bonnet, tailgate, and fuel flap latch securely. A misaligned panel may result from a minor adjustment issue, but it can also be a clue to previous impact damage. Context matters.
🧯 Include Emergency and Legal Readiness
Condition checks should include items that become relevant only when something goes wrong: a serviceable spare tire or approved mobility kit, jack and wheel tools where supplied, warning triangle if required locally, and basic first-aid or roadside equipment appropriate to the journey.
Confirm that registration, inspection, insurance, and emissions-related obligations are current for your location. Requirements vary substantially, so the vehicle handbook and local authorities are better references than assumptions based on another region.
📝 Build a Practical Inspection Schedule
Some checks suit a monthly routine: tire pressure, obvious tread damage, lights, washer fluid, and fresh leaks. Check tires before long trips and after striking a pothole or curb. More detailed brake, suspension, and underbody inspections can align with scheduled service intervals.
Use a simple record with date, odometer reading, readings taken, and action required. Photographs are helpful for monitoring cracks, corrosion, and localized tire wear. The goal is not constant worry; it is noticing a meaningful trend early.
🚫 Avoid Common DIY Inspection Errors
Do not inspect only the outer face of a tire, assume both brake pads wear equally, top up unknown fluids, or clear a warning lamp without finding the cause. These shortcuts can hide the evidence needed for correct diagnosis.
Another frequent mistake is tightening wheel nuts by feel alone after wheel removal. Wheel fasteners require the manufacturer’s tightening sequence and torque specification. Incorrect torque can damage threads, distort components, or leave a wheel insecure.
👨🔧 Know When Measurement Must Become Professional Diagnosis
Arrange qualified inspection for exposed tire cords, bulges, persistent pressure loss, brake-fluid leaks, grinding brakes, severe pulling, warning lamps related to braking or steering, major corrosion, or a sudden change in handling.
Professional diagnosis adds tools that a visual check cannot replace: lifts, brake gauges, scan tools, alignment equipment, pressure testing, and component specifications. Providing your observations—such as “vibration begins at 80 km/h” or “inner rear tread is lower”—can save time and improve the quality of the investigation.
✅ The Core Principle: Measure, Compare, and Act Early
Vehicle condition is best understood as a pattern of evidence. Measure tire depth across the tread, compare brake-pad wear on both sides, observe fluid levels over time, and connect symptoms to operating conditions rather than relying on a single impression.
Small checks cannot predict every failure, and they should never override manufacturer instructions or professional safety advice. But they make maintenance more informed: a driver can separate normal ageing from a developing fault and act before worn parts affect control, stopping, or reliability.
Regular measurement and thoughtful observation turn vehicle maintenance from guesswork into preventive engineering. A few minutes of checking can make the next service conversation clearer and the next journey more confident. 🚗🛞🛑